Threat Modeling: Deciding What You Will Not Defend
About This Lesson
This is the last lesson in Module 1, and it is the one that makes the other three usable.
Lesson 1 gave you three concepts and a table of trade-offs, and it said that you must decide those trade-offs consciously. Lesson 2 gave you an exposure map and a four-layer model. Lesson 3 gave you a specific set of controls for a specific leak. None of those lessons told you which controls you actually need.
That is what threat modeling does. It is the method that turns “here are some good practices” into “here are the four things that I will do this month, and here are the nine things that I have decided not to do, and here is why.”
The title of this lesson is deliberate. Most people read threat modeling as a way to find more things to defend. It is the opposite. A threat model is mainly a record of the defenses that you have decided to skip, and the reasons that you accepted for skipping them. If your threat model does not let you say no to something, you have written a wish list.
Learning Objectives
After you read this lesson, you can do these tasks:
- Name the main threat modeling frameworks and say which one fits a privacy problem.
- Build a threat actor list that is specific to you, with honest likelihood ratings.
- Classify your assets, including the assets that are not files.
- Draw an attack tree that ends in something you can act on.
- Score and sort risks, and explain where the scoring method breaks.
- Write and maintain a threat model that guides real decisions.
Prerequisites
- Lessons 1.1, 1.2 and 1.3.
- Your completed self-assessment worksheet from Lesson 1.
- Your completed open source intelligence findings from Lesson 2.
- Your metadata findings from Lesson 3.
1. The Process, and Where the Questions Come From
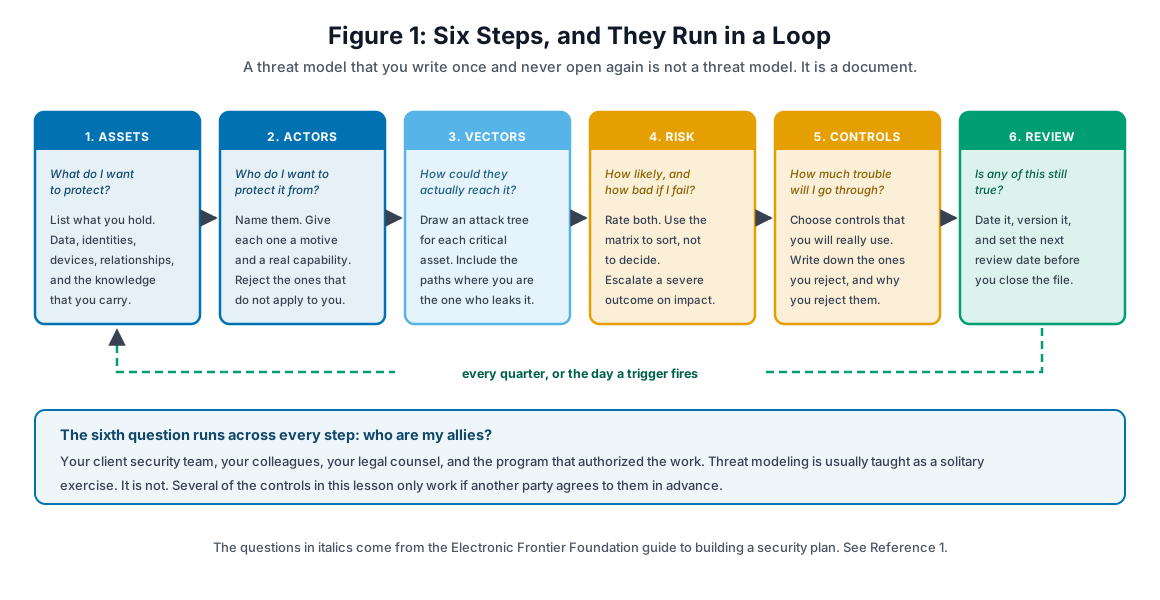
Figure 1. Six steps, and a return arrow. The return arrow is the part that most people leave out.
The questions in Figure 1 are not original to this course. They come from the Electronic Frontier Foundation guide to building a security plan, which asks six questions: what do I want to protect, who do I want to protect it from, how bad are the consequences if I fail, how likely is it that I will need to protect it, how much trouble am I willing to go through to prevent the consequences, and who are my allies. (Reference 1)
Most versions of this list that you find in security training drop the sixth question. Do not drop it. For an ethical hacker it is often the most important one, because several of the controls in this course only work if another party agrees to them first:
- A bug bounty program has to accept your registered source address before anonymity becomes a scope violation instead of good practice.
- A client has to agree to an encrypted delivery channel before you can use one.
- Your legal counsel has to exist before the day that you need legal counsel.
Your allies are a control. Write them down like one.
2. The Named Frameworks
You do not have to invent a method. Four established ones cover most of what a security professional needs, and each answers a different question. (Reference 7)
STRIDE classifies threats to a system into six kinds: spoofing, tampering, repudiation, information disclosure, denial of service, and elevation of privilege. It is the standard choice when you model a system that you are building or testing. It is a security framework, not a privacy one.
LINDDUN is the privacy equivalent, developed at KU Leuven. Its seven categories are linking, identifying, non-repudiation, detecting, data disclosure, unawareness, and non-compliance. LINDDUN GO reduces it to a set of threat cards for a lighter session. (Reference 8, Reference 9)
Read that first category again: linking. LINDDUN treats “these two records can be connected to the same person” as a first-class threat with its own name. That is exactly the mechanism of Lesson 2 and Lesson 3. If you want one framework for the problems in this course, LINDDUN is the one, because it is built around the failure that this course is about.
PASTA is a seven-stage, risk-centric process that starts from business objectives. It suits an organization more than an individual.
Attack trees are not a classification scheme at all. They are a way to decompose one goal into the paths that reach it, which is what Section 5 uses.
A note on scope. For your personal threat model, use the six questions in Figure 1 as the spine and borrow LINDDUN’s categories when you list what could go wrong with an identity. You do not need a formal methodology to protect one person. You do need a repeatable one.
3. Your Threat Actors
The point of this section is subtraction. You will find long lists of adversary types in security training. Most of them do not apply to you, and carrying them dilutes the model.
Tier 1: Untargeted and Automated
Mass phishing, credential stuffing against reused passwords, commodity malware, and exploitation of unpatched software. Nobody chose you. You were in range.
Everybody has this tier. It is also where the actual damage happens, and the data is unambiguous on that point.
Tier 2: Targeted, With Ordinary Techniques
Spear phishing that used your public profile as research. A competitor collecting your methods and client list from your talks. A person who was unhappy about the outcome of an engagement.
Your exposure here scales with your visibility. A researcher who publishes and speaks has more of this tier than one who does not. This is a real cost of a public profile, and it belongs in the decision about whether to build one.
Tier 3: Determined and Resourced
Here the original version of this lesson said something that is comfortable and wrong. It said that a nation-state adversary rates likelihood 1, because “you are not that important.”
For this profession specifically, that is false, and there is a documented reason.
On 25 January 2021, Google’s Threat Analysis Group published an account of a campaign by a government-backed group based in North Korea. The targets were not banks or government departments. The targets were security researchers who work on vulnerability research and development. The actors built a credible research blog, ran fake personas on several social platforms, spent weeks establishing a relationship, and then offered to collaborate. The payload was a Visual Studio project. Some researchers were compromised through the blog itself while running a fully patched system and a current browser. Google returned to the campaign in later reporting when the actors rebuilt their fake personas. (Reference 3, Reference 4)
Read that as a threat modeling input, not as a news item. If your work involves vulnerability research, a state-sponsored actor has a demonstrated, published interest in your class of person, and the lure is tailored to how you actually work: a peer offering to collaborate.
What this changes in your model. Not much in terms of controls. You are still not going to defeat a determined state actor with better password hygiene. What it changes is the likelihood rating and one specific habit: the verification step before you run an unfamiliar project from a new contact. That control costs almost nothing, and it addresses the exact vector that was used.
What this does not license. Do not now rate every exotic threat as likely. The correction is narrow and evidence-based. One documented campaign against your profession raises one likelihood rating. It does not turn your threat model into a spy film.
Tier 4: Situational
These apply to some readers and not others, which is the whole point of a personal model:
- Legal process. Note carefully: as an ethical hacker you are not avoiding legitimate law enforcement. Your interest is client confidentiality, contractual obligations, and knowing what you are required to disclose. Those are different problems with different answers, and confusing them is how people get into trouble.
- Domestic and physical proximity. A person with physical access to your devices defeats most technical controls. If this applies to you, it dominates your model and the ordering of everything else changes.
- Employer monitoring. Present for most employed people, usually lawful, and mostly addressed by not doing personal or operational work on employer equipment.
The Rule That Actually Matters
Most people overrate the exotic tiers and underrate the boring ones. The 2026 Verizon Data Breach Investigations Report puts numbers on it: exploitation of a software vulnerability was the leading route into a breach, at roughly 31 percent of analyzed cases, and it passed credential theft for the first time in the report’s history. Credential abuse still appeared somewhere in about 39 percent of full breach chains. Social engineering accounted for about 17 percent of breaches. (Reference 5, Reference 6)
One thing there deserves your attention, because it changes the standard advice. Patching is now the leading vector, ahead of phishing. Older guidance, including the original version of this lesson, treats phishing as the number one threat and lists software updates as a minor item. Reverse that order in your own roadmap. Updating your software is the single highest-value item on the list, and it is also the cheapest.
4. Your Assets
You cannot protect what you have not listed. Work through five categories, because four of them are not files and people forget them.
Information. Client reports and evidence, credentials and keys, unpublished vulnerability research, your own tooling, and your identity documents. These are your critical items, and the impact of losing one is usually severe rather than merely annoying.
Identity. This is the four-layer model from Lesson 2, restated as an inventory. Your true identity, your professional identity, your public personas, and your operational personas. The asset that you are protecting here is not any single identity. It is the absence of links between them, which is exactly LINDDUN’s linking category.
Physical. Laptops, telephones, backup media, security keys, printed documents, and old devices that were never wiped. Also locations: your home, your office, and the places you can be predicted to be.
Relationships. Your colleagues, your clients, and your family. Two directions matter. They can be targeted to reach you, and they can disclose things about you without meaning to. The control here is not technical. It is telling the people close to you which specific things are not for sharing, once, clearly.
Capability and knowledge. What you know about a client network. Your methods. Your sources. These cannot be stolen in the ordinary sense, but they can be disclosed, and they can be attributed to you at a moment when you would rather they were not.
For each asset record: what it is, its classification, where it lives, who can reach it, whether it is backed up, and what protects it right now. That last column is usually the one that produces the uncomfortable discovery.
5. Attack Vectors, and How to Draw a Tree That Helps
A list of attack types is easy to produce and hard to use. An attack tree is harder to produce and easy to use, because it ends at things you can do something about.
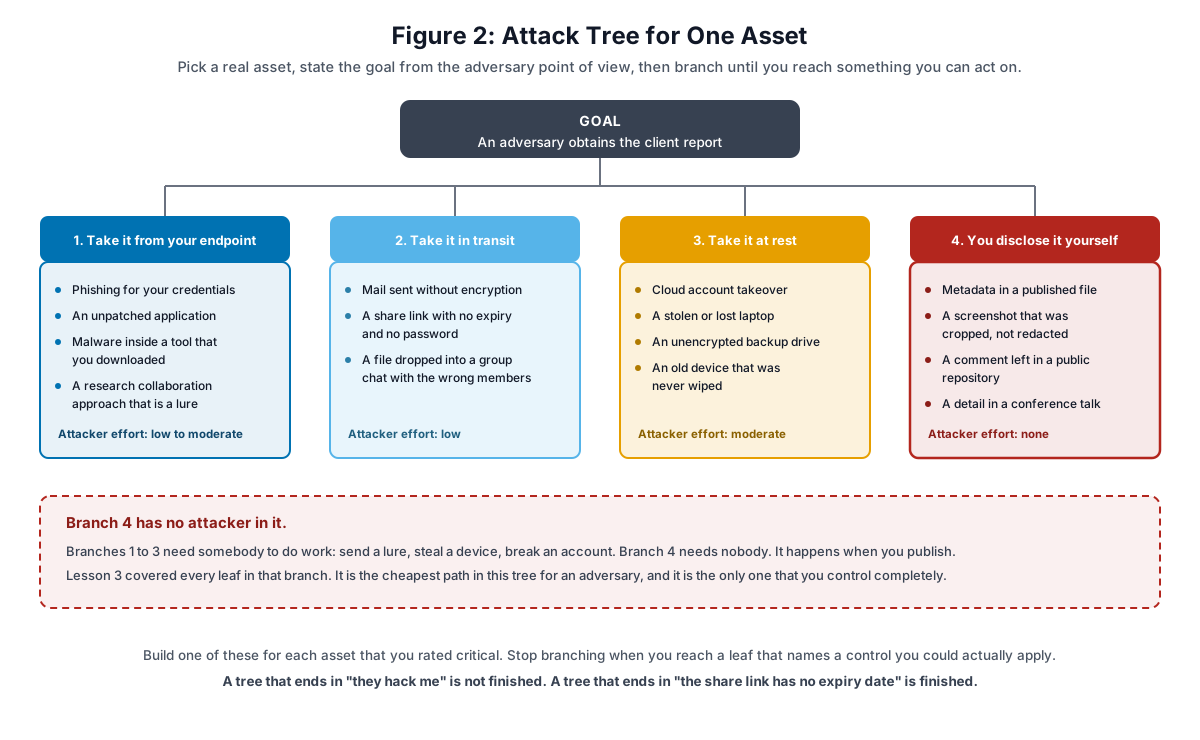
Figure 2. One asset, one goal, four branches. The fourth branch is the one with no attacker in it.
Pick a real asset. State the goal from the adversary’s point of view. Branch until each leaf names something concrete.
Look at branch 4 in Figure 2. Branches 1 to 3 require somebody to do work: send a lure, steal a laptop, take over an account. Branch 4 requires nobody. It happens when you publish. Every leaf in it was covered in Lesson 3.
That branch is the cheapest path in the tree for an adversary, and it is the only one that you control completely. In most personal threat models it is also the one that gets left out, because people model attacks and forget to model themselves.
The test for a finished tree. A leaf that says “they compromise my machine” is not finished, because you cannot act on it. A leaf that says “the share link that I sent the client has no expiry date and no password” is finished, because the next step writes itself. Keep branching until every leaf names a control.
6. Risk Scoring, and the Part Where It Breaks
The usual method is to rate likelihood from 1 to 5, rate impact from 1 to 5, multiply them, and sort by the product.
Use it. It is fast, it is easy to explain, and it beats arguing from instinct. But you need to know exactly where it fails, because a capstone lesson that teaches the method without the failure teaches a bad habit.
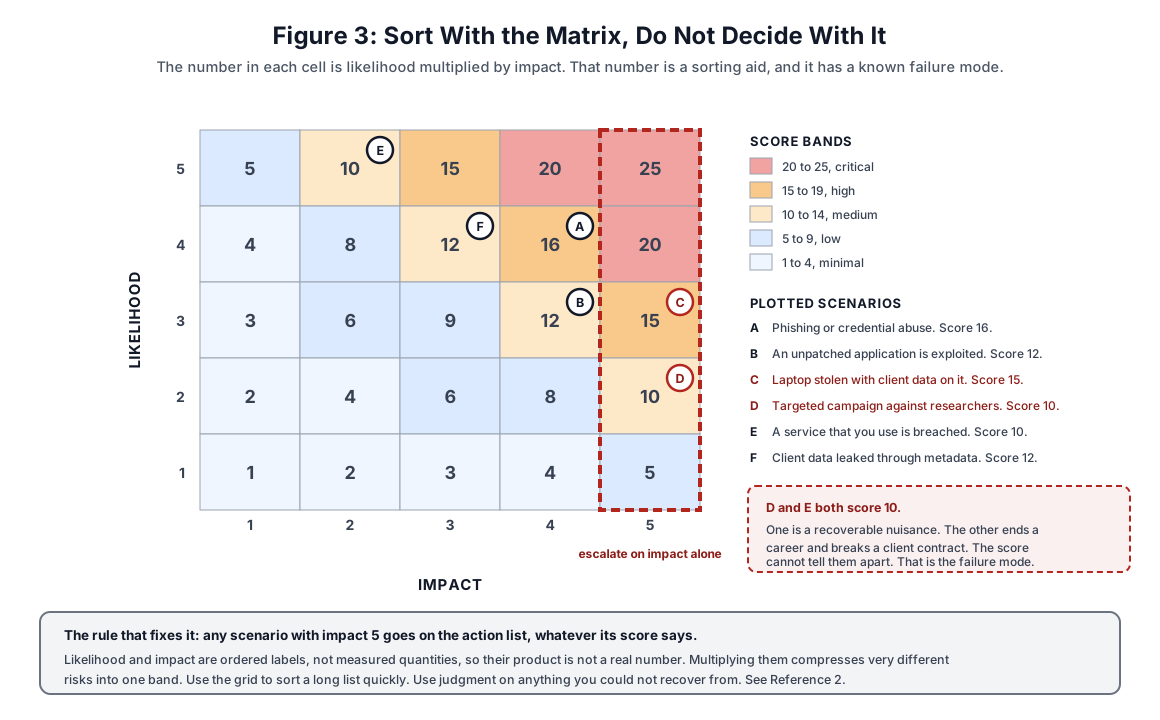
Figure 3. The same grid that every risk course draws, with the correction marked on it.
The Defect
Likelihood and impact are ordered labels, not measured quantities. A “4” is not twice a “2” in any meaningful sense, so their product is not a real number. It is a label made by multiplying two other labels.
This is a documented problem, not an opinion. Tony Cox set it out in Risk Analysis in 2008. Risk matrices suffer from range compression, meaning they assign the same rating to quantitatively very different risks. They have poor resolution, so they can correctly compare only a small fraction of randomly chosen pairs of hazards. And in some cases, particularly when frequency and severity are negatively correlated, they can rank a smaller risk above a larger one, which makes the resulting decisions worse than random. (Reference 2)
What That Looks Like in Practice
Look at scenarios D and E in Figure 3. Both score 10.
E is a third-party service that you use getting breached. Likelihood 5, impact 2. It happens constantly, your passwords are unique, and the outcome is a nuisance and an afternoon of work.
D is a targeted campaign against security researchers of the kind that Section 3 described. Likelihood 2, impact 5. It happens rarely, and the outcome is a compromised research machine, a broken client contract, and possibly the end of your ability to do this work.
Both score 10. Both land in the same band. The number cannot tell them apart, and if you work down a list sorted by that number, you will handle them in whatever order they happen to appear.
The Fix
It is simple, and it is standard practice in serious risk work:
Any scenario with impact 5 goes on the action list, whatever its score says.
Sort with the matrix. Decide with judgment. The grid is a triage aid for a long list. It is not the decision, and a scenario that you could not recover from does not get to be a “medium” because it is also rare.
Apply the same scepticism in the other direction. A scenario with likelihood 5 and impact 1 scores 5 and is genuinely not worth your weekend.
Cost, Honestly Counted
For anything you are considering, compare two totals.
The cost of the control is the money, the time to set it up, the time it takes every single day afterwards, and the chance that it locks you out of your own work. That last item is real and people leave it out. A control that you abandon after three weeks provided nothing and cost you three weeks.
The cost of the incident is the direct loss, the recovery time, the contractual and legal exposure, and the reputational cost. For a security professional the reputational item is frequently the largest one and the hardest to price.
Implement where the control costs less than the expected incident. Then, and this is the step people skip, write down the ones that you rejected and why. A rejected control with a recorded reason is a decision. A rejected control with no record is just something you forgot, and next year you will not be able to tell which it was.
7. What To Do First
Order the work by value for effort, not by how interesting it is.
Week 1, the items with the best ratio. Turn on automatic updates everywhere, because the 2026 data makes this the top item and it costs one afternoon. Put every account in a password manager. Turn on multi-factor authentication on mail, code hosting, cloud storage and your password manager, and use an application or a hardware key rather than text messages. Turn on full disk encryption on every device.
That set addresses the tier 1 threats that produce most real incidents, and it is achievable in a week.
Month 1, your specific high risks. Whatever came out of your own matrix at high or critical, plus everything you escalated on impact. For most readers of this course this includes a working separation between the four layers from Lesson 2, and a metadata sanitization step in the delivery process from Lesson 3.
Quarter 1, the structural work. A backup that you have actually tested by restoring from it. A written incident response plan, even a one-page one. A verification habit before you run unfamiliar code from a new contact.
Continuing. Review. Re-read your own model. Check whether the controls you chose are still in use, because the ones you quietly stopped using are now silent gaps.
Recorded and accepted. Everything else, written down as accepted rather than left unmentioned.
8. Keeping It Alive
A threat model has a version number, a date, and a next review date. If it has none of those, it is already out of date and nobody can tell.
Review every quarter, briefly. Review fully once a year. Review immediately when one of these happens:
- Your role, employer, or the kind of work you do changes.
- You take on a client with a materially different risk profile.
- You have an incident, or somebody in your field has a relevant one.
- You start publishing under a new identity, or you retire one.
- You move, or your domestic situation changes.
- A new capability appears that changes what an adversary can do cheaply.
The last one has become the frequent trigger. The 2026 report notes that attackers are using automation to shorten the gap between a vulnerability being published and being exploited, from months to hours. (Reference 5) A model built on the assumption that you have a few weeks to patch is now wrong, and that is a threat model update, not a news headline.
The Real Test
Your threat model works if it answers questions like these without a debate:
- Should I use my personal telephone for multi-factor authentication codes? Look at the device classification and which layer it belongs to.
- Can I publish this finding? Look at the client obligation, the attribution risk, and branch 4 of the attack tree.
- Should I accept this speaking invitation? Look at what it adds to your tier 2 exposure against what it adds to your public layer.
- Do I need a separate machine for this engagement? Look at the asset classification and the isolation requirement.
- Somebody I do not know has offered to collaborate on some research. What do I do? Look at Section 3.
If your model cannot answer those, it is too abstract. Go back and make the leaves concrete.
9. Summary
- Threat modeling decides what you will not defend. A model that only adds work is not finished.
- Use the six questions, including the sixth one about allies, which most versions drop.
- LINDDUN is the framework built for privacy problems, and its first category, linking, is the exact failure this whole module has been about.
- Rate the boring threats honestly. Patching now leads the data, ahead of phishing.
- Raise one likelihood rating on the evidence: this profession has been targeted deliberately and it is documented.
- Draw attack trees until each leaf names a control. Include the branch where you are the one who leaks it.
- Sort with the matrix, decide with judgment, and escalate anything you could not recover from regardless of its score.
- Record your rejections. A rejected control with a reason is a decision. Without one it is an oversight.
Module 1 Is Complete
Look at what the four lessons actually built, in order.
Lesson 1 gave you the vocabulary and made you notice that you were already making trade-offs without deciding them. Lesson 2 showed you the exposure that you already have, and named the mechanism that turns harmless details into an identity. Lesson 3 gave you the join key that makes that mechanism work, and the tools to remove it. Lesson 4 gave you the method for deciding which of it applies to you.
That is one argument across four lessons, not four separate topics.
In Module 2 the work becomes technical and specific, starting with browser privacy and tracking. Do not begin it until your threat model exists, even in a rough form. Module 2 presents a large number of controls, and without a threat model you will either adopt all of them and abandon most within a month, or adopt none of them. The model is what tells you which ones are yours.
Knowledge Check
Question 1. Which question belongs to the Electronic Frontier Foundation security plan but is most often dropped from a personal threat model?
- A) What do I want to protect?
- B) How bad are the consequences if I fail?
- C) How much trouble am I willing to go through?
- D) Who are my allies?
Answer: D. It is the one that most retellings omit, and for a security professional it is frequently the most important, because several controls need another party to agree to them first.
Question 2. A scenario is rated likelihood 2 and impact 5. The product is 10, and the band table calls that medium. What is the correct action?
- A) Accept it, because 10 is a medium score
- B) Recalculate it on a larger matrix
- C) Put it on the action list anyway, because impact 5 means an outcome that you cannot recover from
- D) Raise the likelihood to 4 so that the score matches your concern
Answer: C. Sort with the matrix and decide with judgment. Option D is the common and wrong response, because changing an input to force a preferred output destroys the value of the rating.
Question 3. Cox showed in 2008 that risk matrices have a specific defect. Which one?
- A) They need too many categories to be practical
- B) They compress quantitatively different risks into one rating, and in some cases they rank a smaller risk above a larger one
- C) They cannot be drawn on a five by five grid
- D) They apply only to financial risk
Answer: B. Range compression and poor resolution. In the negatively correlated case the resulting decisions can be worse than random.
Question 4. The 2026 Verizon Data Breach Investigations Report found that the leading route into a breach was, for the first time:
- A) Exploitation of a software vulnerability
- B) Physical theft of a device
- C) Insider action
- D) Denial of service
Answer: A. About 31 percent of analyzed breaches, passing credential theft for the first time in the report’s history. This is why software updates are the first item in Section 7 rather than a minor one.
Question 5. In January 2021 Google’s Threat Analysis Group reported a campaign that used fake research personas and malicious project files. Who were the targets?
- A) Journalists
- B) Bank employees
- C) Security researchers
- D) Government procurement staff
Answer: C. Specifically researchers working on vulnerability research and development.
Question 6. Why does that campaign change the tier 3 entry in a hacker’s threat model?
- A) It proves that all attackers are state sponsored
- B) It shows that “I am not important enough to be targeted” is false for this profession, so that likelihood rating must go up
- C) It shows that antivirus software is useless
- D) It means that every researcher needs an air-gapped network
Answer: B. The correction is narrow. One likelihood rating rises, and one cheap verification habit gets added. Everything else stays as it was.
Question 7. In the attack tree in this lesson, which branch requires no attacker effort at all?
- A) Take it from the endpoint
- B) Take it in transit
- C) Take it at rest
- D) You disclose it yourself
Answer: D. It is the cheapest branch for an adversary and the only one that you control completely.
Question 8. An attack tree branch that ends at the leaf “they compromise my machine” is:
- A) Not finished, because the leaf does not name a control that you could apply
- B) Finished, because it names the threat
- C) Finished, because more detail would be speculation
- D) Not useful, because attack trees apply only to network assets
Answer: A. Keep branching until the next step writes itself.
Question 9. How should a client penetration test report be classified?
- A) Public
- B) Critical
- C) Private
- D) Sensitive, but not critical
Answer: B. It holds another organization’s confidential findings under contract. The impact of losing it is severe, not merely inconvenient.
Question 10. You reject a control because it costs more than the incident that it prevents. What must your threat model record?
- A) Nothing, because a rejected control is not part of the model
- B) Only the name of the control
- C) The control, the risk that it would have addressed, the reason for rejecting it, and the residual risk that you accept
- D) A commitment to implement it next year regardless
Answer: C. A rejected control with a recorded reason is a decision. With no record you cannot tell later whether you decided or simply forgot.
Capstone Exercise: Write Your Threat Model
Time: 4 to 6 hours. This is the Module 1 capstone and it uses the output of all three earlier labs.
Before You Start
Put these on the desk:
- Your self-assessment worksheet from Lesson 1.
- Your open source intelligence findings from Lesson 2.
- Your metadata findings from Lesson 3.
You are not starting from nothing. Most of the raw material already exists.
A note on length. Aim for something you will re-read, not something that hits a page count. A focused eight pages that you open every quarter beats twenty-five pages that you never open again. Write the sections below in order and stop when each one is honest.
Handling note. This document lists your assets, your weaknesses, and your unmitigated gaps. It is itself a critical asset. Encrypt it, keep it in the layer where it belongs, and do not put it in a shared drive or a note-taking service that you have not assessed.
Section 1: Header and Summary
Version number, date, next review date. Then one page:
- Your top three threat actors, named.
- Your top five critical assets.
- Your three highest risks, with scores.
- Your honest one-line assessment of where you stand today.
Write this section last, even though it goes first.
Section 2: Threat Actors
For each actor, record the tier, the motive, what they can realistically do, a likelihood rating from 1 to 5, and a priority.
Two requirements:
- Justify every likelihood rating above 2 in one sentence. If you cannot, lower it.
- Include an actor that you are deciding not to defend against, with the reason. This is the section where subtraction happens.
Section 3: Asset Inventory
Cover all five categories from Section 4 of this lesson: information, identity, physical, relationships, and capability. For each asset record what it is, its classification, where it lives, who can reach it, its backup status, and what protects it now.
Pull your identity assets straight from your Lesson 2 layer map. Pull your exposed assets straight from your Lesson 2 findings, because those are already confirmed exposures rather than hypothetical ones.
Section 4: Attack Trees
Draw a tree for each asset that you classified critical. Three or four trees is normally enough.
Every tree must include the branch where you are the one who discloses the asset. Populate that branch from your Lesson 3 findings.
Apply the finishing test: keep branching until each leaf names a control that you could apply.
Section 5: Risk Register
Aim for 12 to 20 scenarios. For each one: the scenario, the actor, the target asset, the vector, likelihood, impact, the score, what currently protects it, what risk remains, and the planned action.
Then do these two things:
- Plot them on a matrix, as in Figure 3.
- Mark every scenario with impact 5 for escalation, whatever its score. List those separately. If that list is empty, you have probably rated impact too generously, so check it again.
Section 6: Controls, Both Chosen and Rejected
For each priority risk, name what prevents it, what would detect it, and what you would do in response.
The rejected list is a required part of this section, not an optional one. For each rejected control: what it was, what it would have addressed, why you rejected it, and what residual risk you are accepting.
Grade yourself on this section honestly. If your rejected list is empty, you have not made any decisions. You have written a wish list, and you will implement none of it.
Section 7: Procedures
Short, specific, and usable. Not aspirational.
- What you do at the start of an engagement.
- What you do before you publish anything.
- What you do when you travel.
- What you do in the first fifteen minutes after you suspect a compromise, including who you telephone. This is where your allies list becomes operational.
Section 8: The 90-Day Plan
Take Section 7 of this lesson and make it yours. Every item needs an owner, which is you, a date, and a way to tell that it is done.
Be realistic about volume. Four items completed beats fourteen items started.
Reflection
Two pages, answering:
- Which risk did you overestimate before you did this work?
- Which one did you underestimate?
- What is the single highest-value thing on your list, and when will it be done?
- What is the largest gap that you are choosing to accept, and are you genuinely comfortable with that?
- Which control that you already have in place did you discover you had quietly stopped using?
Question 5 is usually the most productive one.
Assessment
| Area | Points | What is measured |
|---|---|---|
| Threat actors | 20 | Specific to you, honestly rated, with at least one actor deliberately excluded and justified |
| Asset inventory | 20 | All five categories covered, current protection recorded accurately including where it is absent |
| Attack trees | 15 | Leaves reach a control, and the self-disclosure branch is present and populated |
| Risk register | 20 | Realistic scenarios, correct scoring, and the impact-5 escalation list applied |
| Controls | 15 | Feasible choices, and a genuine rejected list with reasons and accepted residual risk |
| Procedures and plan | 10 | Specific, dated, and small enough to actually finish |
| Total | 100 |
Note where the marks sit. Two of the highest-weighted criteria reward saying no with a reason. That is deliberate, and it is the skill this lesson is teaching.
Additional Resources
Frameworks
- Electronic Frontier Foundation, Your Security Plan: https://ssd.eff.org/module/your-security-plan
- LINDDUN privacy threat modeling: https://linddun.org
- OWASP Threat Modeling Cheat Sheet: https://cheatsheetseries.owasp.org/cheatsheets/Threat_Modeling_Cheat_Sheet.html
Data to Check Yearly
- Verizon Data Breach Investigations Report: https://www.verizon.com/business/resources/reports/dbir/
Re-read the current edition once a year and adjust your likelihood ratings against it. This is the cheapest way to keep a threat model connected to reality instead of to your assumptions from three years ago.
Discussion Questions
- Which threat have you been defending against out of habit rather than out of evidence?
- Name one control that you set up and have quietly stopped using. Why did it fail, and was the failure the control or the fit?
- Your model is written for the work that you do today. Which part of it breaks first if your role changes next year?
References
- Electronic Frontier Foundation, Surveillance Self-Defense, Your Security Plan
- Cox, What’s Wrong with Risk Matrices?, Risk Analysis, volume 28, pages 497 to 512, 2008
- Google Threat Analysis Group, New campaign targeting security researchers, 25 January 2021
- Google Threat Analysis Group, Active North Korean campaign targeting security researchers
- Verizon, 2026 Data Breach Investigations Report
- Verizon, news summary of the 2026 Data Breach Investigations Report findings
- OWASP Cheat Sheet Series, Threat Modeling Cheat Sheet
- LINDDUN privacy engineering framework, KU Leuven
- LINDDUN GO threat categories